Smashed burgers are as simple as it gets when it comes to hamburgers, but you get the best results when you understand what makes a smashed burger work.
In this guide, you will learn:
- How the way a smashed burger cooks affect the taste
- What equipment you need for smashed burgers
- A step-by-step tutorial on how to properly smash a burger for the best results
- Tips to get better flavor and texture from your smashed burger
Whether you’ve tried to make smashed burgers before or not, by the end of this guide you will be an expert burger smasher.
What is a Smashed Burger
A smashed burger is a diner-style burger that uses a thin patty. The name ‘smashed’ comes from the technique used to get a nice thin patty.
What makes a smashed burger special is how the way you cook it impacts the flavor and texture of the patty.
By smashing the meat into a thin patty, it creates more surface area to come in direct contact with the hotplate. This means you end up with a better crust on the patty and a better flavor.
Because the patty is thin, it also cooks lightning fast. It’s no surprise that this is a popular method used in diners and fast-food chains. The faster the burger cooks, the faster they can be served.
If you want to try and create a tastier version of a McDonald’s Big Mac, or copy smashed burgers like popular chains such as In-N-Out or Shake Shack, this guide is for you.
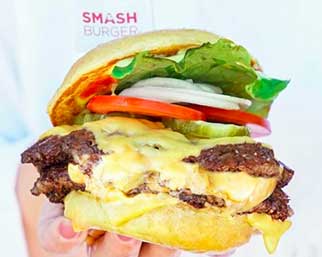
Some people will say that smashing a burger removes all of the juices. Anybody who knows how to correctly smash a burger knows this is a myth. As you will see later on, if you properly follow the step-by-step instructions, you will end up with a surprisingly juicy burger with an incredible crust.
Do You Need a Smashed Burger Press?
A smashed burger press is a tool some chefs use to easily apply pressure to the burger. You may have seen chefs use something like these when smashing burgers:
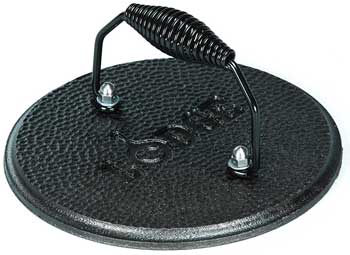
The good news is that you definitely don’t need a smashed burger press to achieve great results. if you have a decent spatula, I’ll show you how to use it to properly smash your burgers.
For most people, there’s no need to buy a press. But if you like having a range of tools with your BBQ, check out some smashed burger presses here (link to Amazon).
Tips for a Better Smashed Burger
Here are some basic tips to keep in mind to get better results when making smashed burgers.
Use 80/20 ground beef
The first time I tried to make burgers I used 100% lean beef. Big mistake. Without any fat, you miss out on a lot of the flavor and the burger doesn’t cook as good as it would with fat.
Using ground beef with around 20% fat is generally accepted as the best mix for burgers.
After you smash it, don’t touch it
The only time you should press down on the meat while it is cooking is at the very start when you first smash it. Every time you poke or press down on the meat, you’ll loose important juices that give the burger flavor.
When you flip the burger over, don’t press down on it again. It doesn’t need to be smashed again on the other side. If you let the meat cook undisturbed, you’ll end up with a juicier and better burger.
Lightly toast the buns
Soggy buns suck. To prevent your burger buns from absorbing the juice from the meat, lightly toast it before you start cooking.
Slightly brown the inside of the buns by placing them on a hotplate, in the oven, or with a grill.
Here is a homemade burger bun I made from this recipe that has been toasted in the oven immediately before cooking a smashed burger:
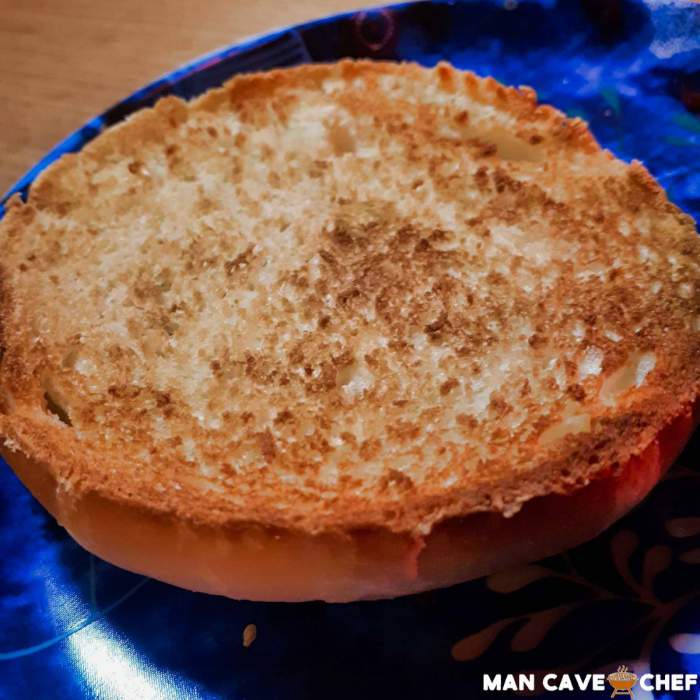
Not only will the light toasting help prevent the buns from getting soggy, but the browning adds new flavor to the bun thanks to the Maillard Reaction. It should be no surprise that the above bun added a lot of flavor to the burger.
Even slight toasting can make a big difference, so if you’ve only ever made burgers using fresh and untoasted buns, try slightly toasting the insides to see how it changes your results.
Use whatever type of cheese you want
Any time I see a recipe or video talking about smashed burgers, there’s always a debate over what cheese to use.
Some people feel that American cheese is the only real option when making a smashed burger. Other people see American cheese as the worst thing you could put on a burger. It blows my mind how snobby and childish some people can be when they hear that somebody else prefers something different in their burgers.
Use whatever cheese you want!
Life is too short to be bickering over what cheese to use. If you like American cheese, go for it! If you prefer cheddar, great!
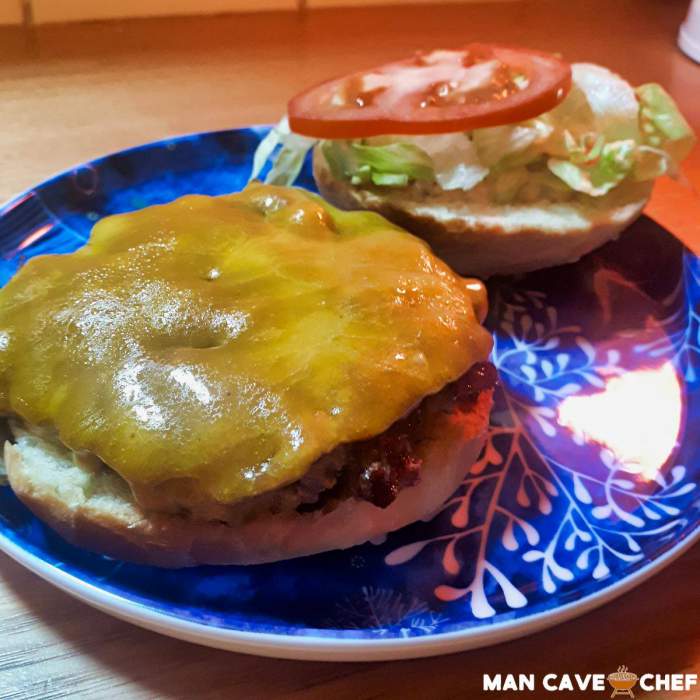
In the below example I used cheddar because American cheese isn’t easy to find in Australia.
Use whatever toppings you want
Just like cheese, you can add whatever you want to your smashed burgers. While the traditional diner-style burger is often incredibly basic in toppings, put whatever you want in your burger.
Pickles, tomato, lettuce, cheese, onions, egg, beetroot, sauces – if you like the taste, go for it!
Don’t let anybody tell you what you should or shouldn’t put in your burger. In the below example I keep it simple using tomato, lettuce and burger sauce but you should use whatever toppings you prefer.
How to Smash a Burger Step-by-Step
Before you start, it’s a good idea to have everything ready to go to plate your burger. The meat will cook lightning-fast, so have your bread rolls and any toppings ready to go before you start.
If you make your own burger buns like in this recipe, make sure you prepare them early enough so they’re ready to go before you start cooking.
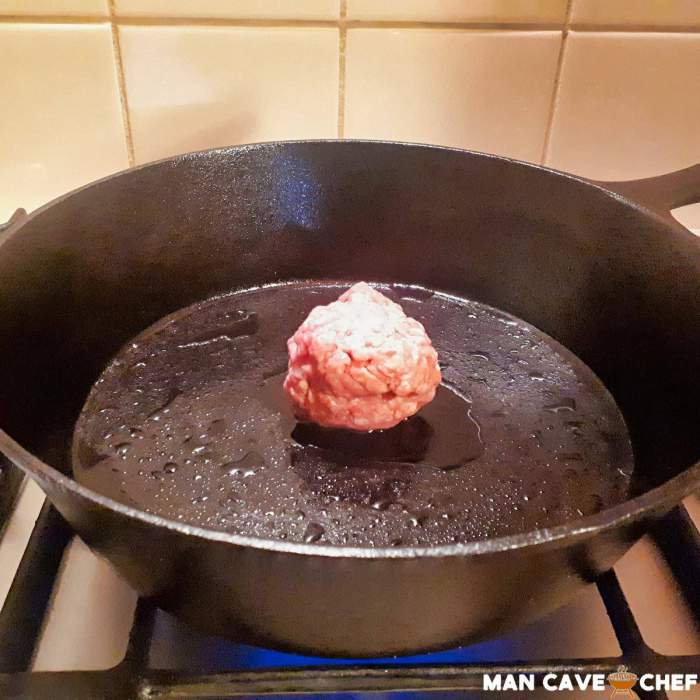
Start by taking your ground beef and loosely form balls. I’ve seen some recipes use an ice-cream scoop to do this, but, seriously, it’s not that hard to form a ball of meat!
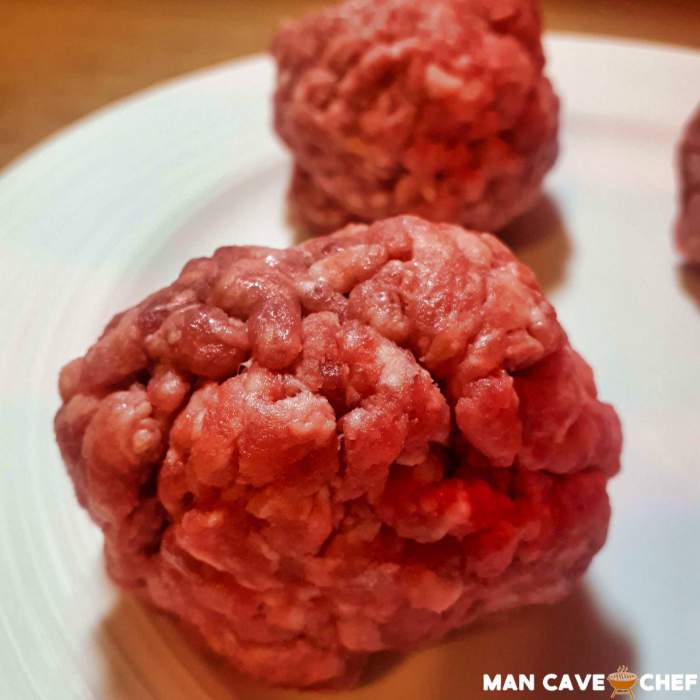
Avoid tightly squishing them as the only time you want to apply pressure is when you smash them onto the hotplate.
Remember that the balls will spread out when you smash them, so aim to form fairly small balls (eg: golfball size) on your first attempt. If you make the balls too big, you’ll end up with a monster-sized patty that won’t fit in the patty.
You get the best results when the meat is cold right before cooking, so do this while you heat up your hotplate.
I used a cast iron pan for my day-one batch and my BBQ hotplate for the day-two batch. Both worked extremely well as the thick metal does an excellent job at retaining heat.
I highly recommend using cast iron to smash a burger. If you don’t have a cast-iron pan, find out in this guide why you might want to get one in addition to any non-stick pans you have.
Lightly add some oil and heat the pan/hotplate to a high temperature (if you see your oil start to smoke, it’s definitely hot enough) and add the first ball.
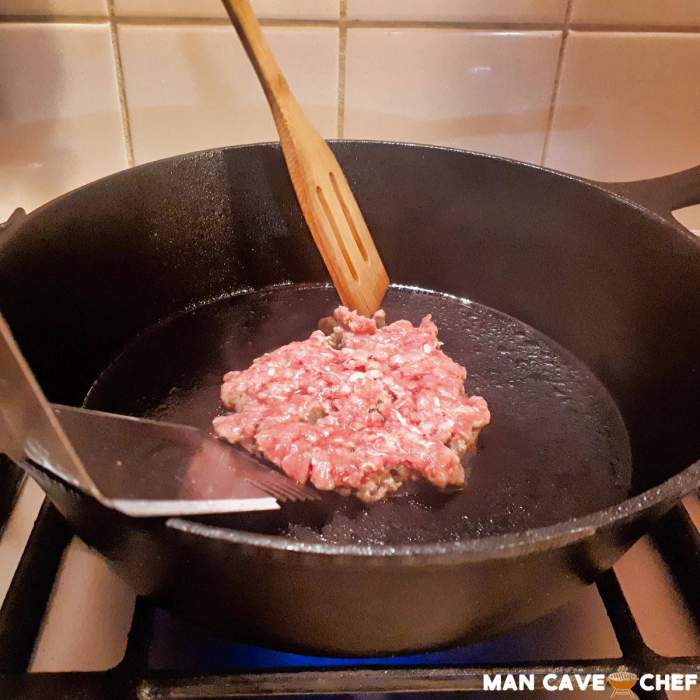
Immediately take your spatula and the handle of something else and press down on the ball of meat as hard as possible.
Using a handle or something else to press down on the spatula gives you better leverage to properly smash the burger. The first time you do this, you’ll see why I said that a smashed burger press is unnecessary.
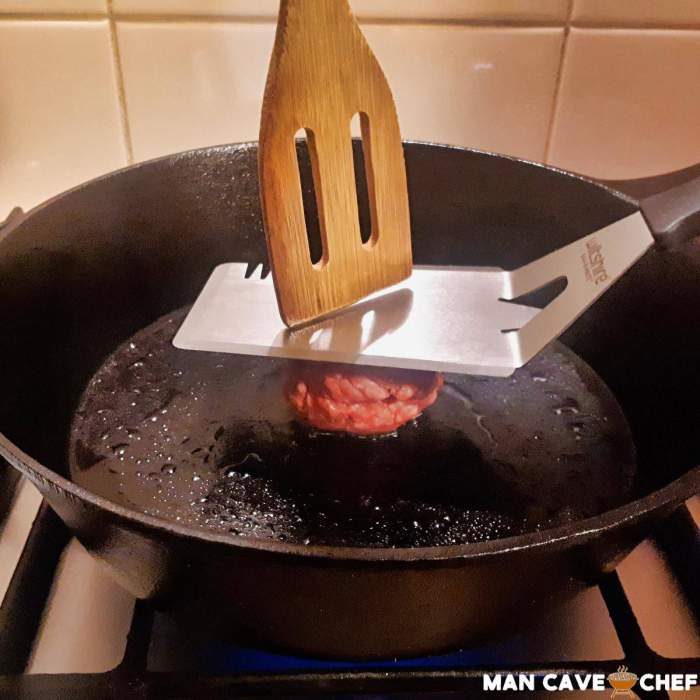
The thinner you can make the patty, the crustier it will be after cooking.
If your spatula isn’t wide enough, the meat will start spilling out the sides. Simply shift the spatula over and press down as shown below:
You should end up with a completely flat and spread out patty.
Don’t worry about shaping the edges – those little bits sticking out are delicious!
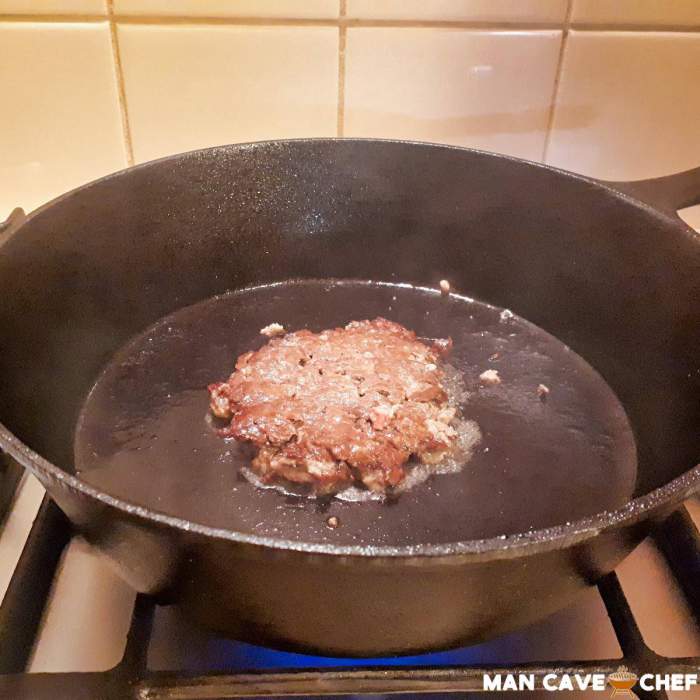
Now that you have smashed your burger, do not touch it until it is ready to flip. Add some salt and pepper while it is cooking and wait around 2 minutes.
You will know when the meat is ready to flip by noticing two things:
- You will be able to see the browning on the meat creep up the side. You may even notice holes in the meat start to turn brown.
- You may start to see red juice build up on top of the patty. This is the sign that the patty is ready to flip over.
In the below photo, you can see that these burgers (from my second-day batch on a BBQ) are ready to flip over:
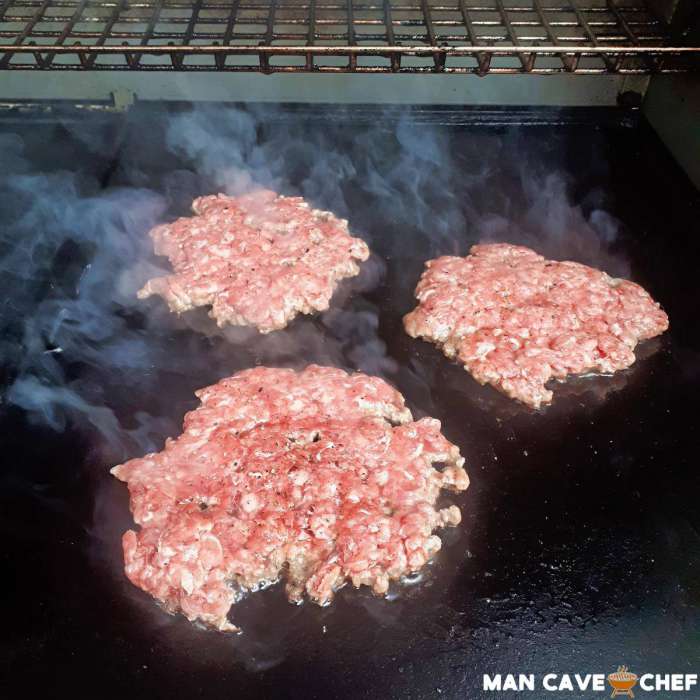
Notice the brown is creeping up the edge of the patty as well as in some of the holes. You can also see red juice building up on top of the patty, which is a clear sign they’re ready to flip. The closest burger was placed down first, so you can see that it is slightly ahead of the other two.
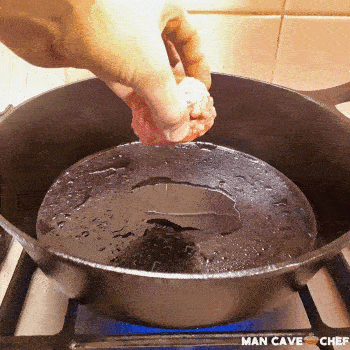
Use your spatula and push down under the patty and forcefully scrape it off of your pan.
This is one of the reasons I highly recommend a cast-iron surface. If you have properly seasoned your cast-iron (find out about cast-iron seasoning here), you won’t damage your pan.
You want to completely remove all of the crust from the pan, so really make sure you cleanly separate the meat from the pan.
Flip it over and do not press down on it.
Immediately add a slice of cheese of your choice to the meat to let it melt. Add any additional salt and pepper and your meat will most likely be ready in less than 60 seconds.
By the time you flip the burger over, it has already cooked 70-80% of the way through. It doesn’t take long for the other 20% to cook, so be ready to transfer the burger to the buns.
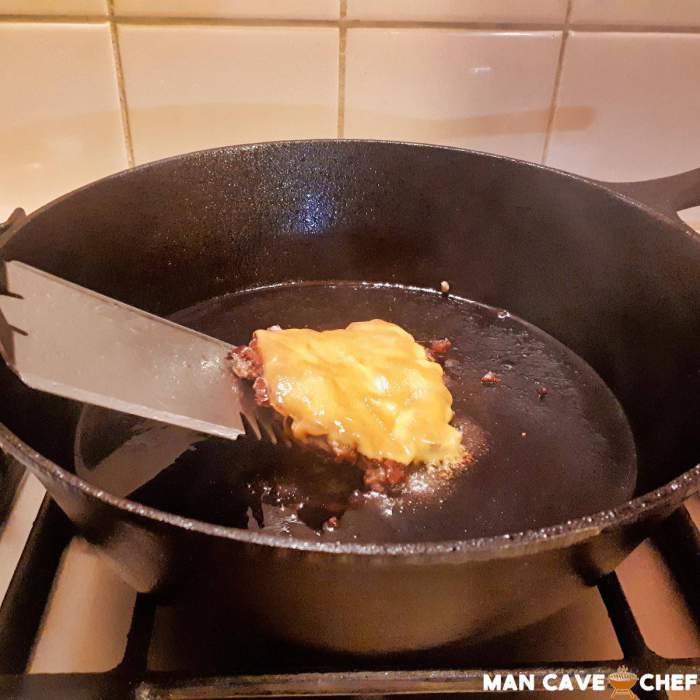
Depending on how oily your patty ends up, you can either transfer it directly to your prepared buns or set it on a paper towel for 10 seconds before transferring to the bun to remove excess oil.
As you can see from the above photos, I used a deep cast-iron pan for the first batch. This made it awkward to cook more than one burger at a time while leaving enough room to get the spatula in position.
During the second-day batch, I used a BBQ hotplate and found it significantly easier to prepare multiple smashed burgers at the same time.
Before you start cooking your smashed burgers, make sure you plan ahead on how you can access the burgers, smash them, then flip them over.
Here are the key points to keep in mind when cooking smashed burgers:
- The burgers cook ridiculously fast, so have everything prepared and ready to go before you place the first burger in the pan
- Only press down on the burgers once at the very beginning – avoid touching it at all to retain as much juice as possible
- Be firm when flipping the burger over. You don’t want to leave any crust on the pan as that crust gives the burger flavor
- Prepare the buns ahead of time so you can instantly serve while the meat is hot
If you really want to step up your burger game, try combining a smashed burger with homemade burger buns from this recipe. If you’ve never made burger buns before, you might be surprised by how good they taste.
Here is an animation of the entire smashed burger cooking process:

As you can see, it’s a simple process that doesn’t require much effort. Keep in mind that the above animation doesn’t show me seasoning the meat after smashing it or before adding the cheese. So don’t forget to season it for extra flavor!
